🔋 Power Up Your Savings!
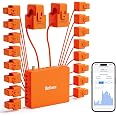
The Refoss Smart Home Energy Monitor EM16 offers real-time energy consumption tracking with 98% accuracy, supports up to 16 branch circuit sensors, and integrates seamlessly with Home Assistant. With a 36-month history of detailed data and smart alerts for unusual energy spikes, this device empowers homeowners and businesses to optimize energy usage and reduce costs effectively.
| Manufacturer | Refoss |
| Part Number | EM16 |
| Item Weight | 4.22 pounds |
| Product Dimensions | 4.5 x 3.48 x 1.1 inches |
| Item model number | EM16 |
| Color | Orange+White |
| Item Package Quantity | 1 |
| Included Components | Home Energy Monitor, WiFi Antenna Assembly, 200A Current Transformers x 2, 60A Current Transformers x 16, 3.5mm Insulation Plugs x 2, 2.5mm Insulation Plugs x 16, Wire Nuts x 3, Extra Wires x 3, Wire Harness, User Manual |
| Batteries Included? | No |
| Batteries Required? | No |
M**M
Accurate Energy Monitor: Professional Setup strongly recommended, complex HA Integration
• Solid Performance: The Refoss Smart Home Energy Monitor delivers reliable, accurate energy consumption tracking, offering detailed real-time data that helps you understand your home’s electricity usage.• User Experience: In my experience, the device itself works very well and provides useful insights for managing energy use, making it a strong choice for those who value precision.• Home Assistant Integration Challenges: Despite its excellent performance, I couldn’t get Home Assistant to work with it. This is a notable drawback if you’re planning to integrate your smart home devices seamlessly.• Mandatory Professional Installation: The installation instructions are exceptionally clear: you must hire a licensed professional. This not only increases the overall expense but also adds extra time to the installation process.• Overall Verdict: If you’re after a dependable energy monitoring solution and are comfortable with the additional cost and effort for professional installation, this is a great device. However, if Home Assistant integration is a priority, you need to be aware that it might be a little tricky to set up.Last Note:The pictures I've added show one of the very strong recommendations not to install it yourself. I didn't realize how complex this would be. I also wanted to show how sleek that packaging and design were. The orange is nice since it's easy to identify all the other wires in the electric panel.Update:Customer service was helpful and gave me further instructions to set up home assistant. I'm adding an additional star due to great customer service. They informed me that most people are able to install it by themselves. I unfortunately was too intimidated by all of the warnings to not install yourself and hire a professional. Honestly must have been a CYA kind of thing.Anyways, just understand what you're getting yourself into when doing this!
V**.
Poor manual causing unnecessary loss if time during installation. Everything else works fine.
Great device, out of the box connected to WiFi and the app with no issues. Through the app, surprisingly fast update rate (all readings delayed by 10 sec., readings taken every 5 sec.). Removed one star for very bad manual. Not the best translation. Also, all smaller 60A sensors are notoriously reading backwards (negative values). Whoever wrote the manual didn't talk to whoever wrote the code. Firmware update allows flip the negative values and rectify this misunderstanding programmatically rather than reopening el. panel and reversing sensors with the arrows towards the breakers. With proper manual would be 5 stars.
L**T
This thing can save you a lot of money!
This thing is AWESOME. My January power bill was over $700. I had no idea why it was so high. I purchased the system to see if I could find out why. The system allowed me to see that my heating system was using almost twice as much energy as it should be using. It also works well for monitoring all of the rest of my usage. I found out that my Hot Water heater accounts for about 1/3 of my energy usage. I can reduce that by installing a timer. In March, my power bill was nearly cut in half without a major change in weather. It has already paid for itself.I installed it myself-Super Easy and the connection to my home network was amazingly simple.
T**7
Refoss Smart Energy Monitor EM16 – In-depth Review
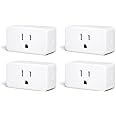
This monitor is great! I wanted to monitor the current of several large appliances that I could not monitor with just smart energy monitor plugs. I also did not want to accidentally turn off the power to something like the refrigerator, as is typical with smart plugs having the ability to turn the plug on/off. Being able to monitor the current consumption and peak amps of a larger appliance allows me to gain possible insights into the health of the appliance.The installation was straight forward with no need to pull the wire out of each breaker, because the Circuit Transformers (CTs) unclip to open up and clamp loosely around the insulated wire and then each CT easily plugs into headphone-jack-style ports on the hub that sits inside the panel. The em16 includes 2 main CTs, each rated at 200 amps that are installed onto the main feeds coming into the electrical panel, and 16 individual Circuit Transformers, individually rated at up to 60 amps to monitor up to 16 individual circuits. Keep in mind that for any appliance that has 2 hots going to the appliance, this will require a CT for each wire to be more accurate, or in some cases, you may want to use a power factor of “2” and only use 1 CT – if the power to both phases are very similar, like an electric heating element.The only real issue that I had was when I assumed the size of the knockout on my exterior electrical panel would be the same size as the rubber pass-though grommet included on the WiFi antenna, it looked really close!People have mentioned in Amazon reviews that the instructions were incorrect when they installed the Smart Energy Meter and see negative readings showing up in the app, but this is due to incorrect installation. I highly recommend testing during the install process to make sure you install the CTs onto the correct phase and correct orientation. I think the directions could be clarified slightly for this reason, also an app update will bring the ability to swap each CT from negative to positive, without having to reinstall each CT if you mess up.The setup of the app was quick and straight forward, automatically finding the device when I opened the Refoss app and then a firmware update that took about 5 minutes. I already had Meross installed on my Home Assistant instance and HA prompted that a new device had been found and I clicked “Add”.Each of the circuits in the app are named something like A1, A2, A3…. B1, B2, etc. but you can rename them easily by clicking on the hamburger button (three lines in the top right of the app) to open up the device settings, then click on the first option, “Device name”, then tap the circuit that you want to include a unique name after the circuit identifier to change the name from “A3-A3” to something like “A3-Water Heater”.How I Chose What Circuits to Monitor in our Electrical Panel:For me, I saved 2 CTs to monitor the 2-phase power coming from our emergency generator. Next, my priority was to monitor our large or power hungry appliances, and then with whatever CTs I had left over, I could monitor a few smaller circuits with wall plugs or lights.I've already created Home Assistant automations around the water heater, dishwasher, clothes washer and clothes dryer circuit sensors, and an automation if the stove/oven is accidentally left on.
Trustpilot
3 weeks ago
2 months ago